Docker has been a hot topic this year. Modern software should have an option to be installed as a Docker container. Not long ago we have created a Docker image for Plesk. This article describes how to install and use Plesk Docker container.
Installation
The official Docker image of Plesk has already been published on Docker Hub. It means that the installation is very simple. Versions 12.0 and 12.5 are available, and 12.5 is marked with the “latest” tag.
Docker has an excellent desktop client called Kitematic we will be using to install Plesk as a Docker container. The procedures described below presume that you have already installed Kitematic (Docker Toolbox).
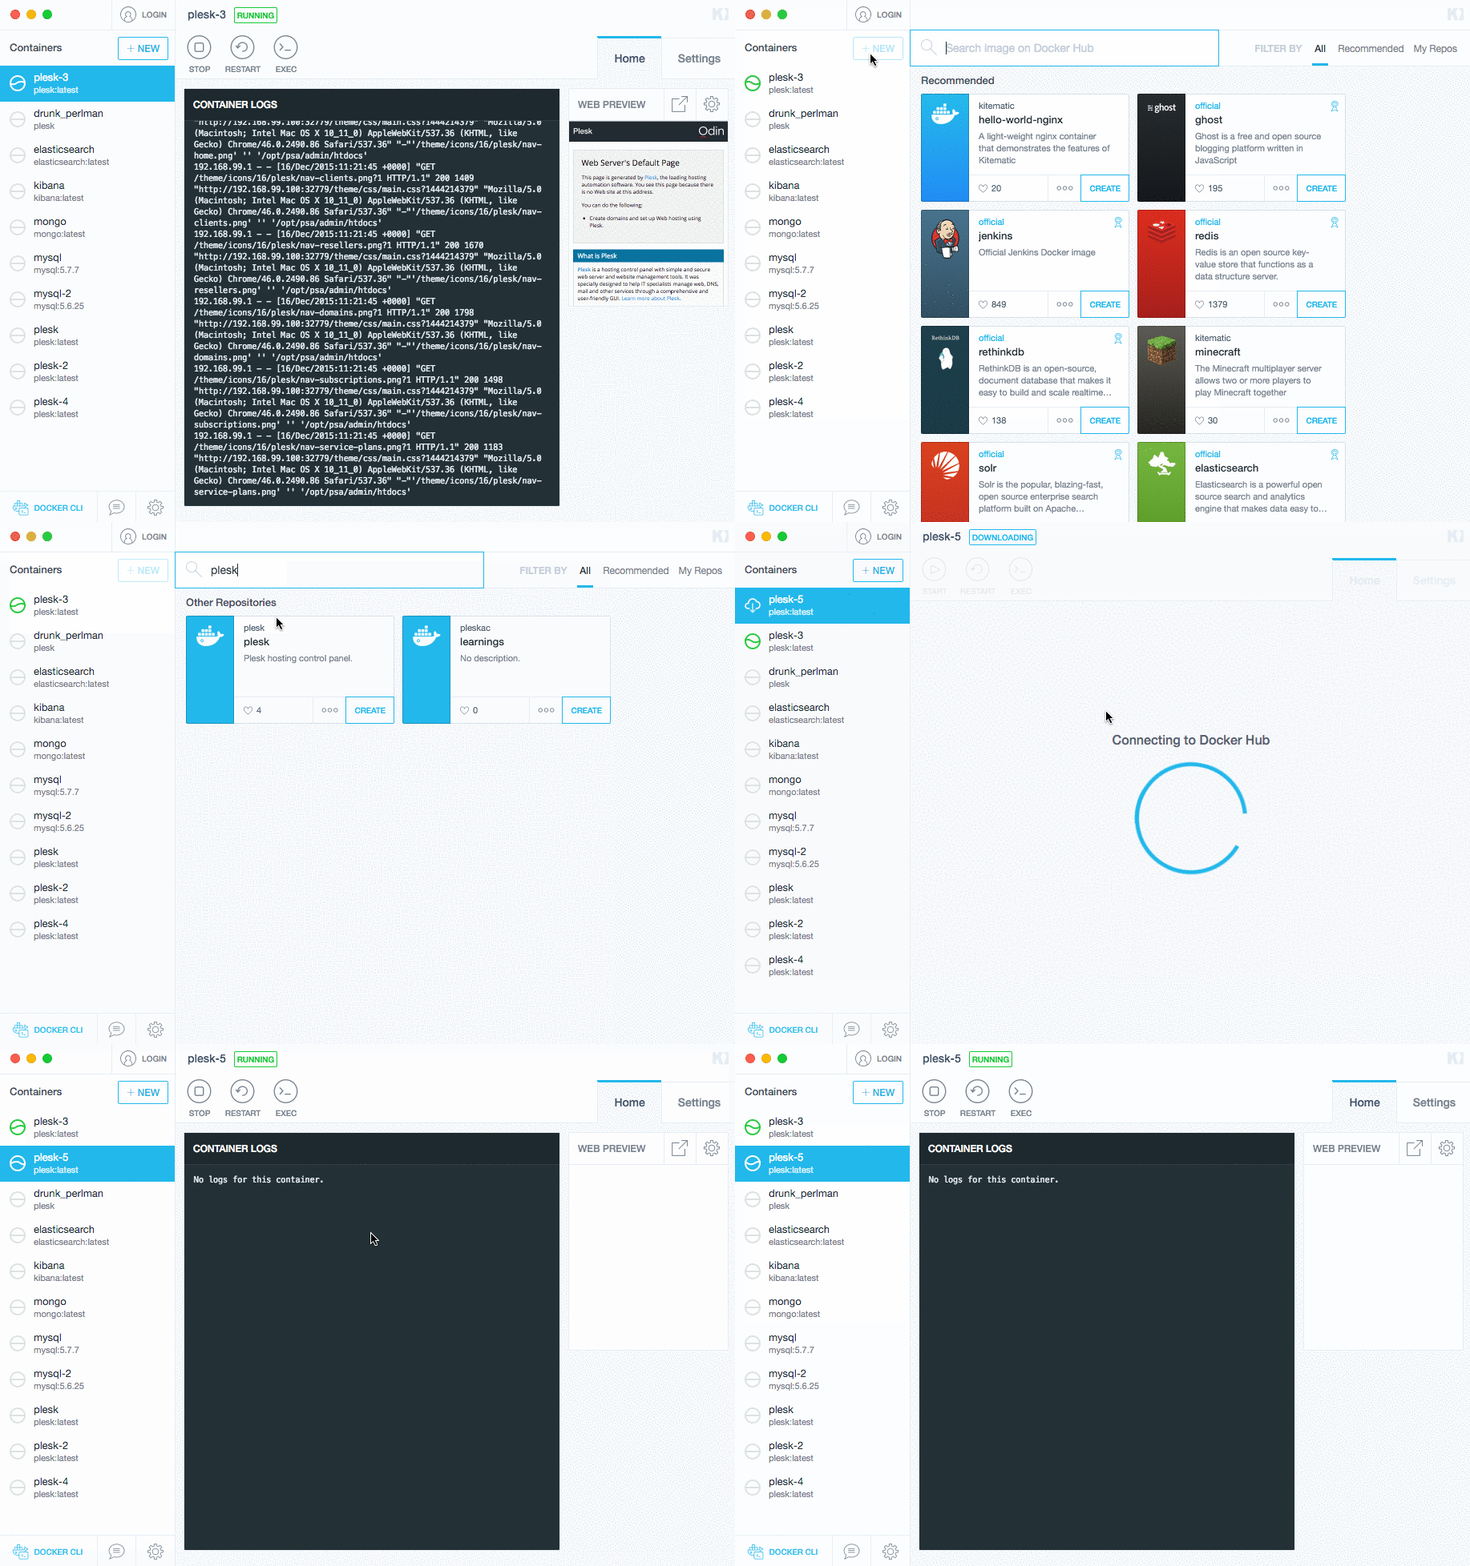
In order to install Plesk, click the “+ NEW” button, type “plesk” in the search field, hit the Enter key, and click “Create” inside the box describing the Plesk image to create a container with Plesk.

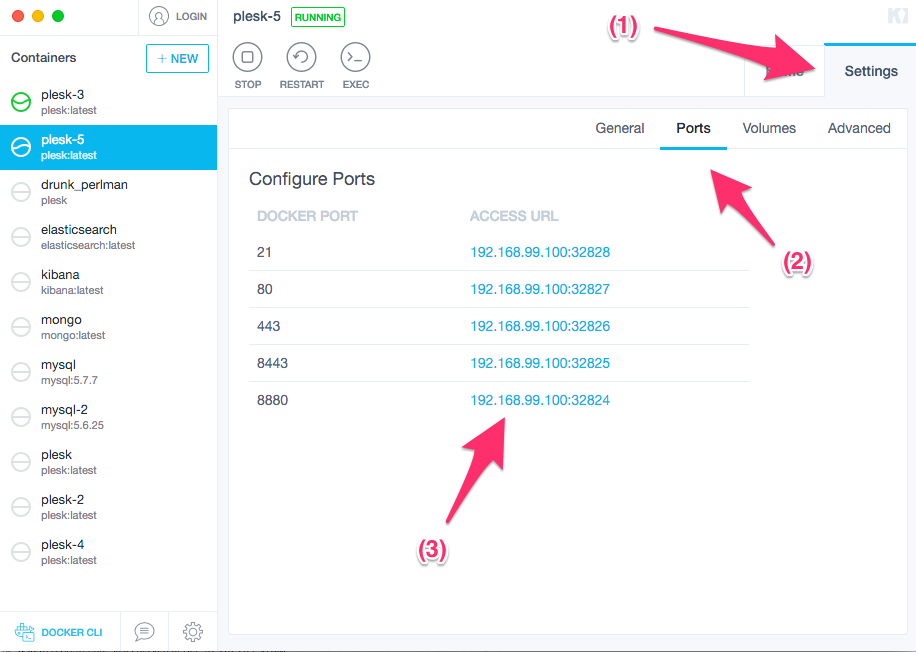
Once the container creation process has finished, you need to log in to Plesk. Docker uses port mapping, and we need to find a mapping for port 8880.

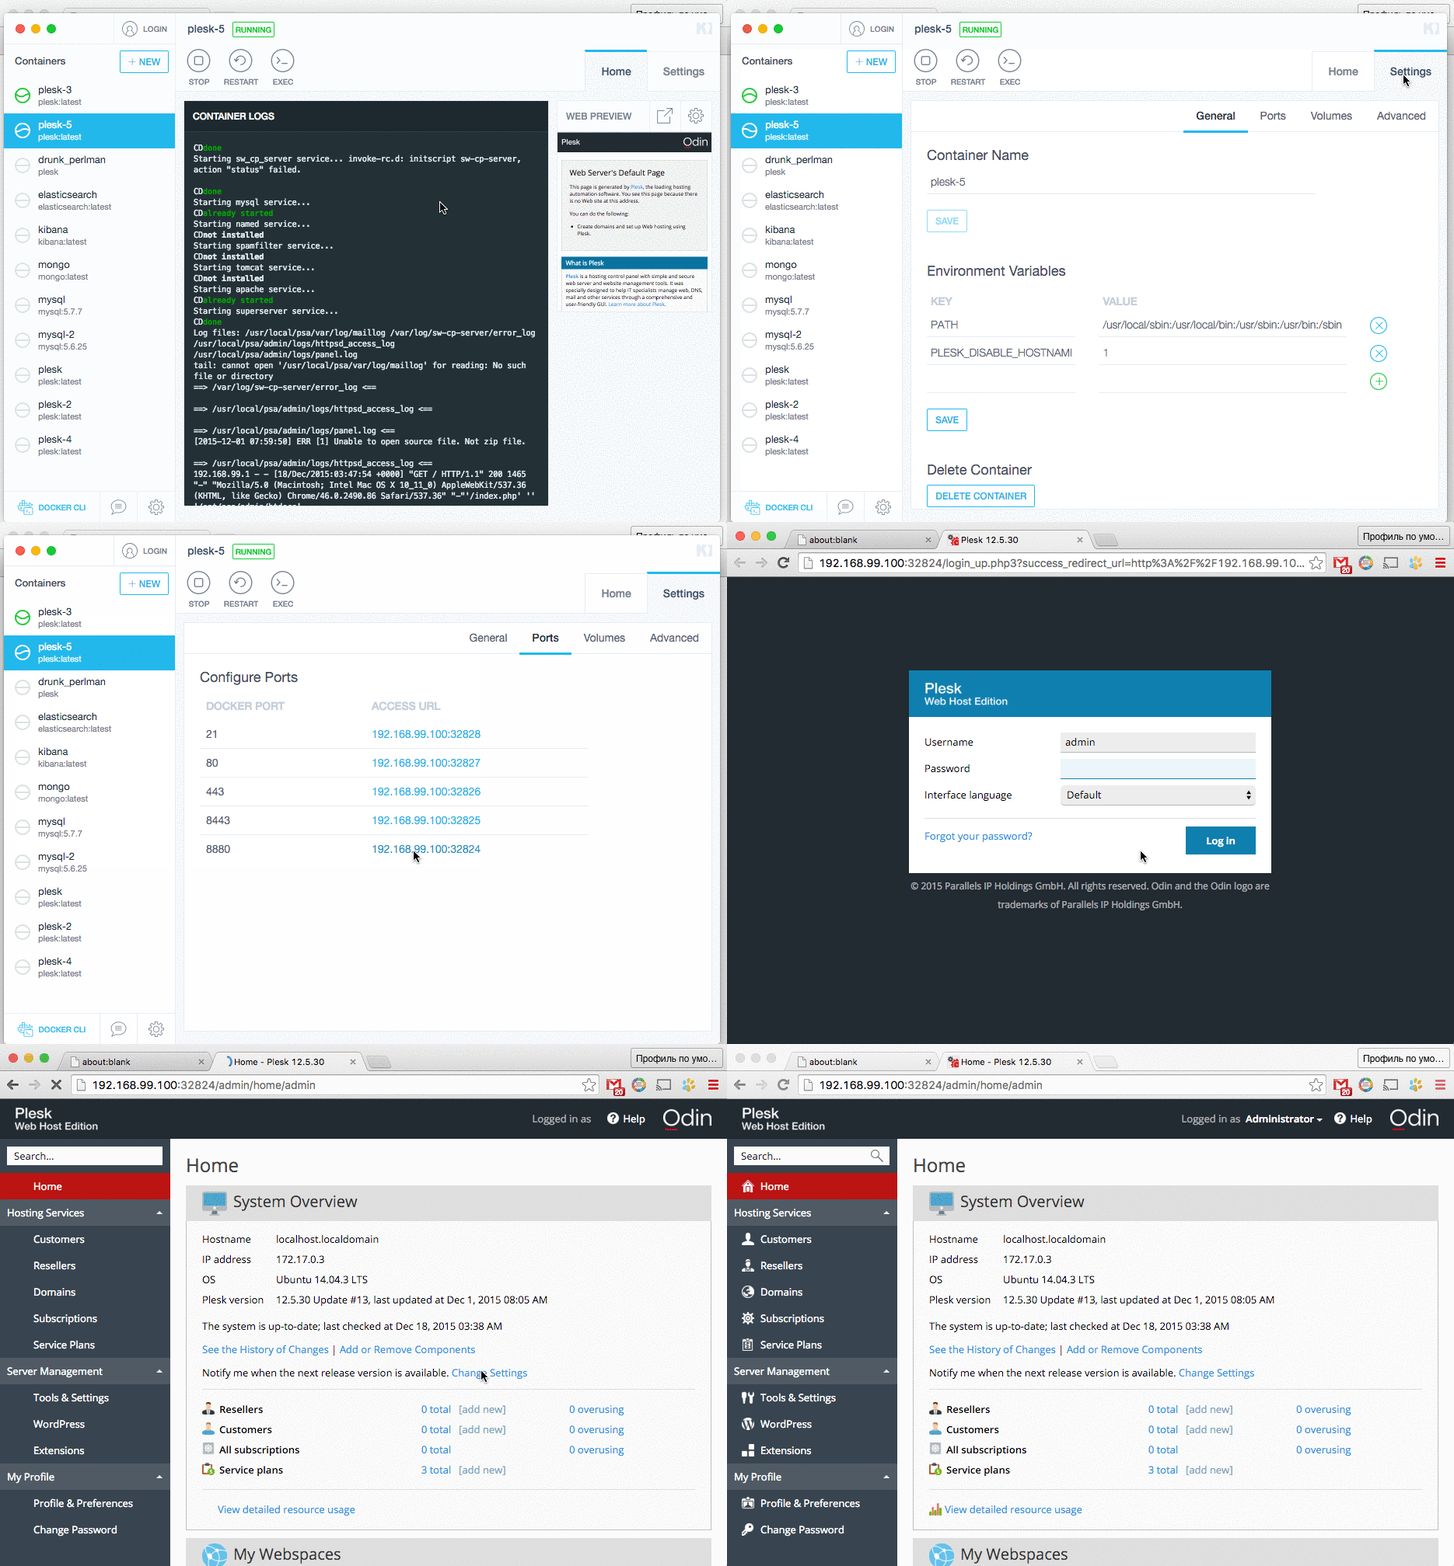
Kitematic provides an additional convenience by presenting access URLs as links. So you can click one and you’ll see the Plesk login page open in your browser.
The default credentials for Plesk (as a Docker image) are:
- Login: admin
- Password: changeme
After logging in you will see the Plesk web interface.

Another option to install a container with Plesk is to use the “docker” command line utility.
To create a container, use the following command:
docker run -d -it -p 8880:8880 plesk/plesk
This command will create a container with Plesk based on the “plesk/plesk” image. The next step is to open the URL of the Plesk web interface. It should look like this: http://< docker-host-ip >:8880
If you do not know the IP of your Docker host, use the “docker-machine” command to retrieve it:
docker-machine ip default
Where “default” is the name of the Docker host (“default” name is used in case of the Docker Toolbox installation).
Practical Usage
Why use Plesk as a Docker container? First of all, it could be used for evaluation purposes. The Plesk Docker image is already pre-configured and comes with a trial license. It means that you get a “ready-to-use” Plesk in a matter of a few seconds. There is no need to perform the installation process, look for the trial license key, and so on. You can start the evaluation process immediately.
Another option is to use Plesk as a Docker container in a way Plesk is regularly used in. Similar to VPS or dedicated server, Plesk as a Docker container can be used to provide shared hosting or satisfy “power user” needs (hosting domains for individual purposes). If you are already familiar with the Plesk image for Amazon, the Docker image will look pretty similar.
Known Limitations
Plesk packaging as a Docker image is still not mature, and there are some known limitations.
If you are using Ubuntu as the Docker host, please disable (or remove) AppArmor. At the moment,Plesk installation fails if AppArmor is enabled.
Manipulations with license could lead to a 502 error. To work around the problem, run the container in the privileged mode (–privileged option for “docker run” command).
Try to avoid any manipulations with the hostname using the Plesk interface. At the moment, such manipulations could lead to errors.
Image Customization
Sooner or later, you will probably think of image customization. You may want to tinker with the configuration settings, customize the UI, or change the set of installed components.
If you want to fine-tune the original image, we strongly recommend to use the Plesk image as the base image (“FROM” directive in Dockerfile).
If you want to change the list of installed components, or have containers without some particular component, you need to customize the original Dockerfile of the Plesk image. Dockerfiles for Plesk are located on GitHub: https://github.com/plesk/docker/
Conclusion
There is a lot of buzz around Docker that is hard to ignore. The simplest way to understand the Docker purpose is to play around with an image (like Plesk) and create a bunch of containers. Earlier on, only some providers such as Amazon had the ability to create a new instance of Plesk within a few seconds, but now with the assistance of Docker, you can do it by yourselves in a very simple manner.
Additional Information
Here is the list of useful links:
- Official Docker site: https://www.docker.com/
- Official place of Plesk image on Docker Hub: https://hub.docker.com/r/plesk/plesk/
- Dockerfile for Plesk 12.5: https://github.com/plesk/docker/blob/master/12.5/Dockerfile
You can use GitHub repo https://github.com/plesk/docker/ to submit issues or feature requests. Also feel free to send us pull requests.


6 Comments
The license of this Docker image will expire?
Yes, license is provided for demo purposes only. One can either buy a real license or use free trial.
hi fellas, i am trying to run migration manager, but it fails when i access trought Tool and settings i believe is something related to url/port issue.
trough Extension i can initiate the app but when i try to access the remote server trought shh credentials i got this:
Failed to fetch basic information about resellers, clients and domains data from source servers
Cause: Command execution failed on the local server with non-zero exit code.
command: echo y | ssh-keygen -q -t rsa -P “” -f /usr/local/psa/var/modules/panel-migrator/sessions/20161202175440/ssh-keys/id_rsa.158.69.97.212
exit code: 127
stdout:
stderr: /bin/sh: 1: ssh-keygen: not found
thanks
By default image does not contain ssh client. You can install it manually inside Docker container using the following command: apt-get install openssh-client
Is this a multi arch image, compatible with RMA architecture?
Ref: https://engineering.docker.com/2019/04/multi-arch-images/
There are no plans for ARM architecture. This image is for x86 arch only.