As a follow-up to the article about Ruby on Rails and Plesk I’ll try to explain how to organize Django hosting on Plesk.
We will use an Ubuntu 14.04 server and Plesk 12.0 for our experiments. I assume that you will get this configuration somehow.
Plesk may use Apache and Apache+nginx for serving of websites. In the scope of this article we’ll check how to setup Django apps hosting only for Apache without nginx.
Let’s get started. First of all let’s check Python presence in the system. You can do it by issuing the command:
python --version
An output can be the following:
Python 2.7.6
Install a Python package manager (under the “root” user):
apt-get install python-pip
It is common practice to have a separate virtual environment for each Python application. So, let’s install the “virtualenv” package (under the “root” user):
pip install virtualenv
We will use Phusion Passenger as an application server for hosting Django projects. So, let’s install it (under the “root” user):
apt-get install libapache2-mod-passenger
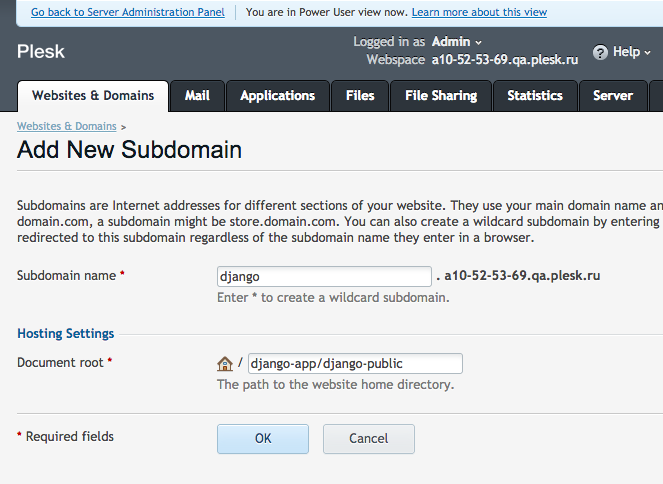
The next step is to create a domain in Plesk for the application. Let it be a subdomain in our case. We’ll have a separate directory for document root and app files:
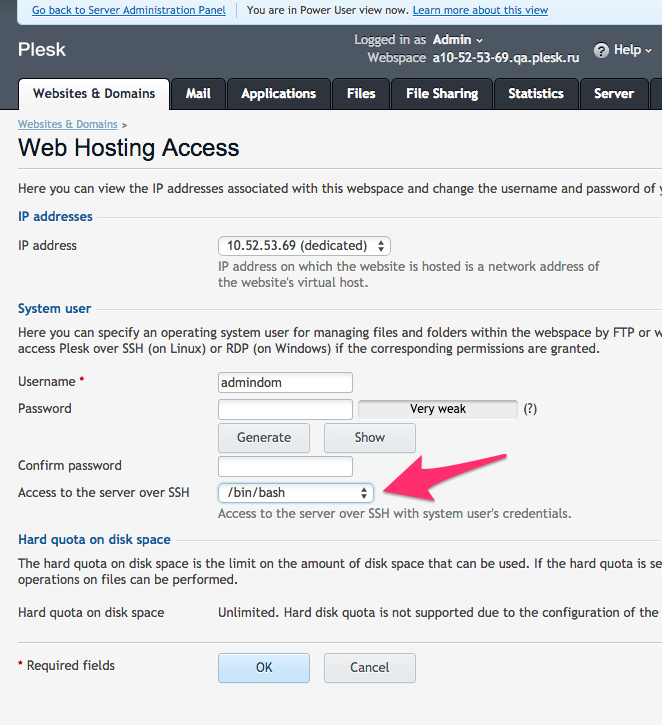
One should take into account that the document root is a subdirectory. In our example django-public is located inside the django-app directory. This is needed for the proper functioning of the application server. To avoid problems, you need to clean up the newly created django-public directory (remove a default site stub). You can do it via file manager, FTP or SSH. It’s more convenient to work via SSH under a particular user (not root), so let’s enable SSH access for the subscription:
Now it’s time to log into the system via SSH under a user account (“admindom” in our case) and take some steps. The “django-app” directory will contain your application and a virtual environment for it. Go to the “django-app” directory and create a virtual environment for Python:
cd django-app/
virtualenv django-app-venv
Activate the new virtual environment to make sure that subsequent commands will be performed in a proper context:
source django-app-venv/bin/activate
Next step is to install Django framework. The latest stable version of Django can be installed by “pip”:
pip install Django
You can verify your Django installation using Python interpreter. Type python in the command shell and use the following code:
>>> import django
>>> print(django.get_version())
1.7
Now you can upload your application via FTP or SSH. If the application is located at the “app” directory, you need to upload files to “django-app/app” directory. So the “django-app” directory may look like the following:
app/
django-app-venv/
One of the possible ways to serve static assets is to copy them to the corresponding directory:
cp -R ./django-app/django-app-venv/local/lib/python2.7/site-packages/django/contrib/admin/static \
 ./django-app/django-public/
To serve our application via the application server, we need to create passenger_wsgi.py file inside the “django-app” directory with the following content:
import sys, os

app_name = 'app'
env_name = 'django-app-venv'

cwd = os.getcwd()
sys.path.append(cwd)
sys.path.append(cwd + '/' + app_name)

INTERP = cwd + '/' + env_name + '/bin/python'
if sys.executable != INTERP: os.execl(INTERP, INTERP, *sys.argv)

sys.path.insert(0, cwd + '/' + env_name + '/bin')
sys.path.insert(0, cwd + '/' + env_name + '/lib/python2.7/site-packages/django')
sys.path.insert(0, cwd + '/' + env_name + '/lib/python2.7/site-packages')

os.environ.setdefault("DJANGO_SETTINGS_MODULE", app_name + ".settings")

from django.core.wsgi import get_wsgi_application
application = get_wsgi_application()
Variable values in lines 3 and 4 should be replaced with yours.
The final step is to check your app via a browser. If there were errors you can see the “Web application could not be started” error page from Phusion Passenger with details. If everything is OK, you’ll see your application:
In some cases, app restart is required. Instead of restarting of the whole web server, Passenger provides a simple way to restart app. You need to create directory named “tmp” inside “django-app”:
mkdir tmp
After that, to restart the app, you can use the following command:
touch tmp/restart.txt
That’s it. Now you know how to host Django apps using Plesk.


22 Comments
I have no experience with django at all, but I found the way to run django apps on plesk without any special configuration.
I hope this will be useful for someone else:
https://github.com/agarzon/django-plesk-hello-world
Yes, using of Apache mod_wsgi is another option.
Doesn’t work for me… all i get is a Passenger Error Message “Web application could not be started”
Any Hints?
Please describe your problem on forum – http://forum.sp.parallels.com/forums/parallels-plesk-panel-12-x-for-linux-problems-suggested-fixes-and-how-to.735/
Need to provide the whole output (or screenshot), OS name, Ruby version. Maybe you’re using old Ruby, maybe something else.
The configuration steps mentioned here work for multiple domains?
Yes, why not? 🙂
I’ve created a blogpost about installing Python 2.7.x on CentOS 6.6 with Plesk 12 for Django.
See: http://www.vanheest.nl/install-python-2-7-x-on-centos-6-6-with-plesk-12-for-django/
Doesn´t work, I have ubuntu with plesk 12.0.18, help me!! please.
What exactly doesn’t work? It’s better to describe your problem in details on the forum http://forum.odin.com/forums/plesk-12-x-for-linux.735/
Which Plesk editions support this configuration?
Which Linux distro is recommended for this setup?
Any Plesk edition has such support.
Starting from Plesk 12.5 it’s possible to install the Phusion Passenger via autoinstaller.
As you may see, I suggest Ubuntu 14.04. It’s my personal preference. In general it’s better to use some modern OS version.
I need to also setup a deployment script that pulls the latest app code from github.com and i want to use SSH keys. If I create a SSH login, as you have suggested, where does the .shh/ directory go?
Directory .ssh is located inside the home directory of the user. E.g. /var/www/vhosts/*main-domain-name.dom*/.ssh
Doesn’t work for me. I get the “Web application could not be started”. I followed your tutorial except the part about the serve static assets. I couldn’t quite understand it.
Is there an example/test app which I could try to test if everything should work if the app is correct?
“Web application could not be started” error is always followed by additional output about the reason of failure. Please provide it.
Maybe you have different OS, different version of Python. If so you need to fix paths to Python in passenger_wsgi.py file.
Hello Guys,
This work with Plesk Automation 11.5 Linux Node?
There is nothing specific, so probably yes, it should work.
error 504 gateway timeout nginx, some idea for this issue?
thanks.
this post not works, show error 504 Gateway Time-out nginx,
something idea about this error.
my vps information is:
Product version: 12.0.18 Update #98
Update date: 2017/03/17 06:26
Build date: 2015/10/14 14:00
Build target: Ubuntu 14.04
Revision: 333119
Architecture: 64-bit
Wrapper version: 1.1
in advance thanks
Hi,
I followed your tutorial, but when I want to see my websiteI have this message “No index site defined / uploaded”.
on my Plesk, I have put in the “httpdocs” directory, the “django-app” directory.
In this directory, I have my project , the “jango-app-venv” and also the passenger_wsgi.py
Do I need to change some settings in my Plesk administration ?
I have try to change settings “index files”, but I don’t know what I have to write.
Thanks for your help
Will it work with Python3.10.x and djangı4.1?
Hi Mohammad,
Plesk does not currently support this (there’s no built-in mechanism to install/manage Python Apps or Django).
So, although the official answer is “No”, you may try to install it manually on your own risk, and perhaps this support article can help you further.