Many times we were asked to implement support for centralized database (DB) and file storage. Which is understandable because these two features open up many convenient hosting-building scenarios that were previously unavailable or could be created only at your own risk. And also because the fewer single points of failure (SPOF) you have, the more resistant you are to faulting the solution. However, since the release of Plesk Obsidian 18.0.49, using centralized DB (as Beta) and Network File System (NFS) has become possible. Let’s find out what you can do with each of these features.
Please note if you are interested only in the centralized database feature, you can go directly to the ‘Shared or Centralized Database‘ section. However, if you want to locate vhosts files on NFS, you can skip the information about databases and start from the ‘Network File System‘ section. There is no requirement to configure these features together – each can work as a stand-alone feature if you want.
Shared or Centralized Database
Previously, it was a requirement to have a locally running database because Plesk uses it for storing its own database (called “psa”). Even if you connect an external database for the customers’ websites, you must have a local database service for Plesk. This means that you have to maintain that database like install security updates, make backups, watch logs, increase disk and other resources to the server if required, etc. And if you have lots of Plesk servers, it generates lots of additional work. This imposes another serious limitation: you can only use the database that can be installed on the operating system you are using.
But what has changed since Plesk Obsidian 18.0.49? Let’s dive a bit deeper to find out a few new scenarios:
- You can use much less databases for a fleet of Plesk servers, it reduces the amount of maintenance work with the database(s).
- You can move a database from Plesk to another server in a private network, it will increase security.
- Separating web and database services allows you to optimize each server for required tasks, e.g. adding more memory to database servers and allowing them to utilize all available memory, without competitive use with other services.
- It allows the use of MySQL-compatible databases that previously was not supported by Plesk because they could not be installed on the same server together with Plesk. An example of a possible solution is the Galera Cluster for MySQL, which provides a true multi-master and active-active cluster.
- If you prefer a SaaS database from cloud providers, you don’t even need to have a server for the database. And maintenance work can be done via the web-interface. However, this database must be compatible with one of the databases supported by Plesk.
There is also a few cons:
- If you use a single database for all Plesk servers, the database becomes a single point of failure for all those Plesk servers.
- A network speed and connectivity between database server and Plesk should be good enough and stable.
New Servers Deployment
Let’s start. It is not possible to convert an existing Plesk installation to Plesk with a remote ‘psa’ database; it should be for new Plesk installations only. I decided to use Oracle Cloud because of ARM servers and their attractive conditions of free tier for those servers.
First, I create a private network (“local”, 10.0.0.0/24) so that the traffic between Plesk and the database server goes inside this network. To make network setup easier, I allow all traffic inside the private network. As you can see in the image below, I also have a network with public access (“internet”).

For the network with public access, I have a few ingress rules that allow ssh and web-service related traffic (22/tcp, 80/tcp, 443/tcp, 8443/tcp 8447/tcp ports). More information about the all Plesk required ports (it depends on services you are going to use) can be found in our Documentation page.
I’m going to allow all egress traffic to be able to install system updates. If you are going to use the system’s firewall inside the servers, you also need to configure it properly. But if you trust and rely on the cloud’s firewall, you can disable the system’s firewall.
Then, I’ll deploy a few freshly installed Ubuntu 22.04, ARM-based servers. The server for Plesk is also a fresh-installed OS, without pre-installed Plesk because I am going to install Plesk with special command line arguments by myself.
On the list of servers shown below we can see one for database (ha-db.plesk.website) and another one for Plesk (ha-node1.plesk.website). I deploy all servers in the same region, and the availability is one to have good connectivity between them. If I decide to have a backup server for them, I’ll locate them somewhere else to increase availability of data in case of some disaster.
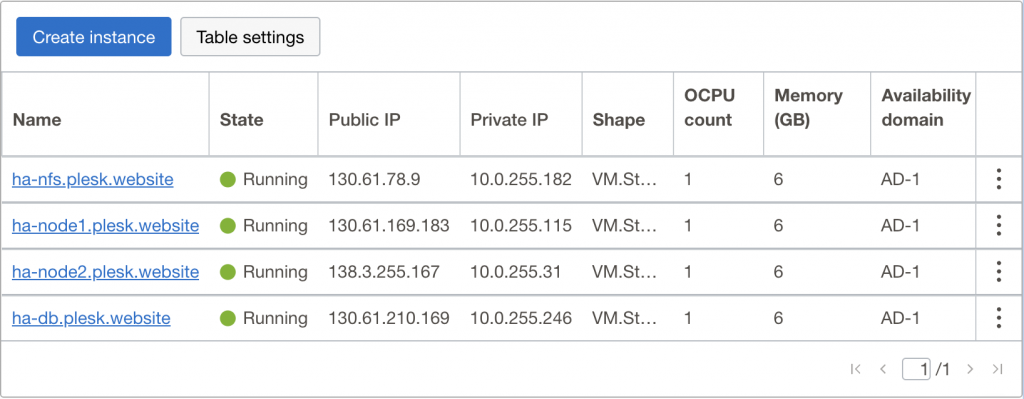
During the server creation, we need to choose the “internet” subnet for the first virtual network interface card (vNIC). After server creation, we need to add a second vNIC and attach it to the “local” subnet. There is a result for the database server:

In the case of the Oracle Cloud, after that you have to automate network configuration for the second vNIC inside the system. I recommend reading this article from the Oracle website to learn more.
If you configure everything correctly, you should be able to log in to each of these servers by SSH and ping each of them using IP-address from the private subnet. If you are unable to do so, I recommend you to check everything one more time.
Database Service Deployment
The desired infrastructure after the database service deployment:
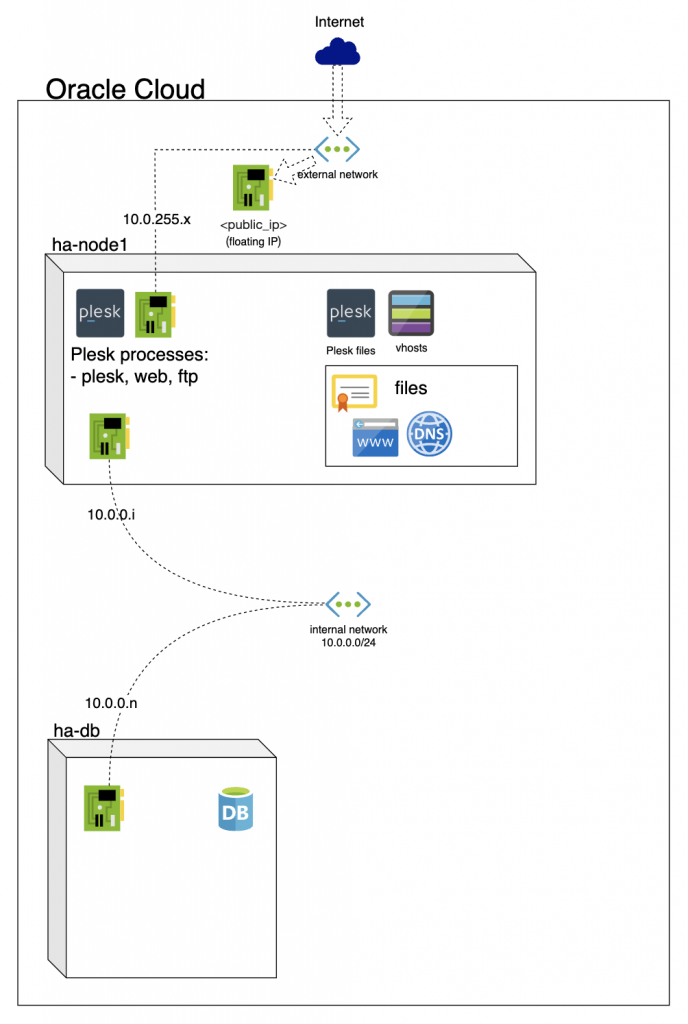
All the details about the process can be found on this Plesk Documentation page.
Before starting installing anything on any new server, I recommend updating system repositories and installing all available system updates. If kernel updates were installed, reboot the server to apply them.
I am going to install MariaDB on the database server. If you prefer a MySQL database, you can follow steps from the Plesk Documentation page – the steps are quite similar but there are slight differences that depend on database type:
- Connect to the database server with SSH.
- Install the package, `apt install mariadb-server`
- Let’s go through a simple configuration with `mysql_secure_installation`
- Add “default-authentication-plugin=mysql_native_password” into “[mysqld]” section in the file /etc/mysql/mariadb.conf.d/50-server.cnf
- Replace a value for “bind-address”, it is also located in “[mysqld]” section in the file /etc/mysql/mariadb.conf.d/50-server.cnf. I set the IP-address from the local vNIC to be sure nobody can connect to the database through the public interface.
- Restart the server: `service mysql restart`
- It’s now a good time to ensure that we have configured everything correctly. Here are a few simple checks:
- Execute `ip a` to check ip-addresses on the network interfaces
- Execute `netstat -anntp` to be sure that database is running and listen for connection on the right IP addresses
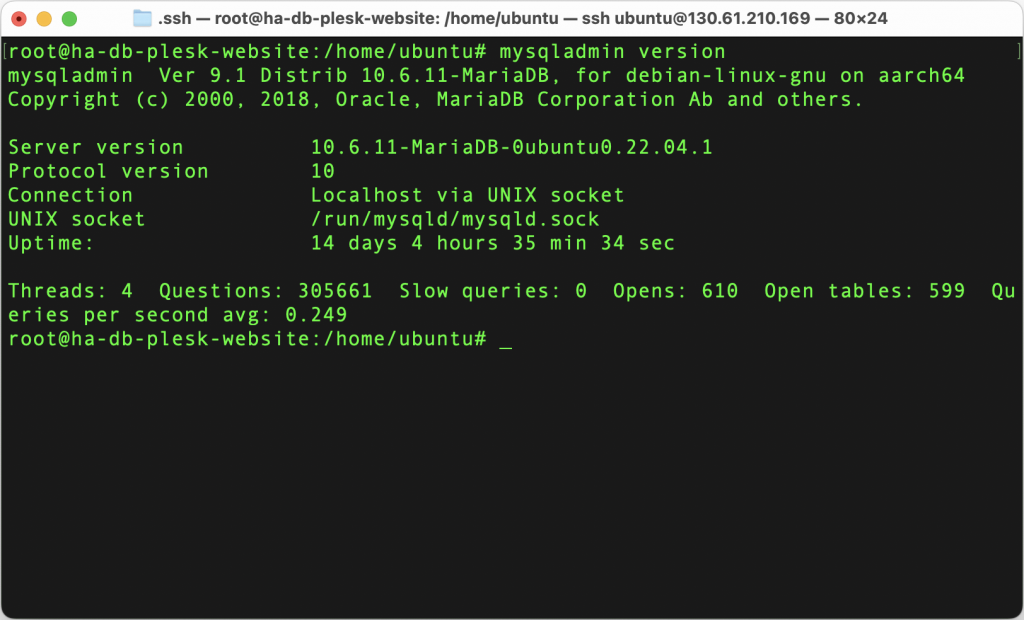
# netstat -anntp | grep 3306 | grep LISTENtcp 0 0 10.0.0.228:3306 0.0.0.0:*
LISTEN 1691/mariadbd - Execute `telnet <database-ip-address> 3306` from another server on the same private subnet to be sure there are no any connectivity issues or firewall misconfigurations.
- Success! We now have a working database and we need to create users to work with the database. I’m going to use a single user per Plesk (please check the Plesk documentation for all the necessary commands). We need to connect to the database (`mysql`) and run the next commands. Don’t forget to set the correct password for each user!
CREATE USER 'mysql_admin'@'%' IDENTIFIED BY '<mysql_admin_password>';GRANT ALL ON *.* TO 'mysql_admin'@'%' WITH GRANT OPTION;CREATE USER 'plesk_db_admin'@'%' IDENTIFIED BY
'<plesk_db_admin_password>';GRANT ALL ON *.* TO 'plesk_db_admin'@'%' WITH GRANT OPTION - Check and note what IP-address is configured on the database server. It’ll be required to configure connection on the Plesk server side. In my case, it is 10.0.0.228.
- We have finished with preparation on the database server’s side. Next steps should be done on the server where we’re going to install Plesk. First of all, we need to download the installer – you can check out the Plesk Documentation to learn more.
- Connect to the Plesk server with SSH
- To download the file, execute `wget https://autoinstall.plesk.com/plesk-installer`
- To make it executable, execute `chmod +x ./plesk-installer`
- The next step, we need to execute the plesk-installer file with additional environment variable(s) to point where the external database is located. In the example below, I use a pre-created login/password for Plesk database admin user, known IP-address of the database and prefix that will be used for all Plesk-required databases.
- PLESK_DB_DSN_PREFIX=mysql://plesk_db_admin: <plesk_db_admin_password>@10.0.0.228/ha_ ./plesk-installer
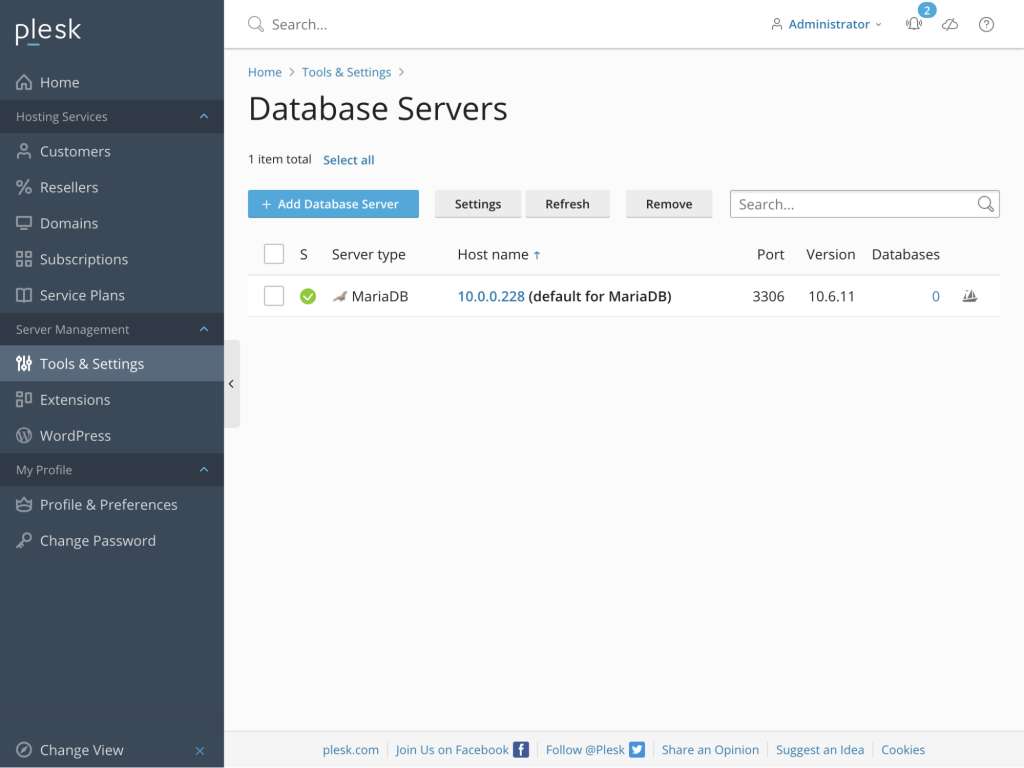
And that’s all. When the installation is finished, we’ll have Plesk that uses a remote database for its own needs and for customers’ websites. If we need to install more Plesk servers that should use the same database server, we need to repeat steps 7-9 with different Plesk database admin’s login/password for security reasons and different database prefixes to exclude collisions between Plesk servers.
Network File System Storage
Before Plesk started supporting NFS storages officially, all website files had to be saved on the same server as Plesk. But not anymore. Since the release of Plesk Obsidian 18.0.49 it is possible to save website files on different resources than the Plesk server. It could be a different server, a cloud storage that provides access via NFS, or dedicated hardware storage with NFS access. And the improvements don’t stop there – let’s have a closer look at the additional advantages for maintenance:
- If you use backups on a file system level, it is easy to make backups of websites’ files from NFS from lots of servers.
- If you need to increase storage space or its performance, you should do it on the resource that provides NFS access.
- Separating web services and storing websites’ files allow optimizing each server for the required tasks, e.g. add more fast disks to the file storage.
- If you prefer SaaS storages from cloud providers, you don’t even need to have a server for storing files and maintenance work can be done via the web-interface. However, these storages must provide access through NFS.
There is also a few cons:
- If you use a single NFS storage for all Plesk servers, the storage becomes a single point of failure for all those Plesk servers.
- The network speed and connectivity between file server and Plesk should be good enough and stable.
Network File System Deployment
The desired infrastructure after the Network File System deployment:
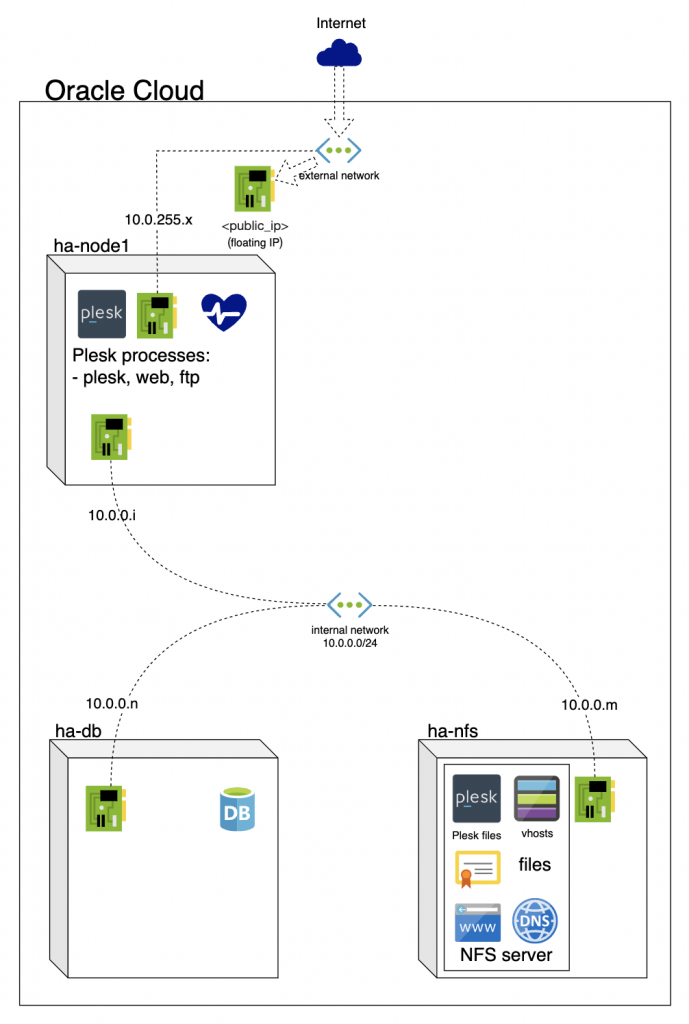
Together with the database server, I have deployed a server for NFS storage. Now is the time to configure it. The first step, before starting installing anything on any new server, is to update system repositories and install all available system updates. If kernel updates were installed, I’d reboot the server to apply them.
I also connect the server to the local subnet to avoid traffic through the public interface, and configure the IP-address setup on the second vNIC automatically. Details about those steps could be found in the section “New servers deployment” above. If you configure everything correctly, you should be able to log in to each of these servers by SSH and ping each of them using IP-address from the private subnet. If you are unable to do so, I recommend you to check everything one more time. If everything looks alright, let’s continue.
- Connect to the NFS server with SSH.
- Install the “NFS server” package, `apt install nfs-kernel-server`
- On Ubuntu22, the part of NFS server (“rpc.mountd”) is started with the option “- -manage-gids”. It helps to reduce the number of requests on the system that use centralized database of system users and groups, but we have servers that use their local users and groups. It means we need to disable that NFS feature on NFS server. For that, check and edit config files if required. On Ubuntu22, there are two files (‘/etc/nfs.conf’, the line ‘manage-gids=y’ in the ‘[mountd]’ section; ‘/etc/default/nfs-kernel-server’, the line ‘RPCMOUNTDOPTS=”- -manage-gids”‘)
- Restart the “rpc.mountd” to apply changes
- Create a directory where Plesk will store websites files, `mkdir -p /var/nfs/plesk-ha/vhosts`
- In my environment, all servers in the internal subnet have IP-addresses from the network 10.0.0.0/24. We need to tell the NFS service that the directory should be available for NFS clients. We need to add a new configuration string into the “/etc/exports/” file. Note, there is no authorization and you need to be sure that you trust the network.
/var/nfs/plesk-ha/vhosts
10.0.0.0/24(rw,sync,no_root_squash,no_subtree_check) - We’re almost finished with the NFS server. We just need to restart the service and check that everything is ok, `systemctl restart nfs-kernel-server`. After that, check that new settings are applied:
root@ha-nfs-plesk-website:/home/ubuntu# exportfs -s/var/nfs/plesk-ha/vhosts
10.0.0.0/24(sync,wdelay,hide,no_subtree_check,sec=sys,rw,secure,no_root_squash,no_all_squash) - Check and note what IP-address is configured on the NFS server. It’ll be required to configure connection on the Plesk server side. In my case, it’s 10.0.0.90.
- The next steps are about preparing the Plesk server and moving the vhosts directory to the NFS server. Connect to the Plesk server with SSH.
- Install the “NFS client” package, `apt install nfs-common`
- To avoid errors of Plesk DB inconsistency during removing subscription, you need to change mode from async to sync for removing operation in “/usr/local/psa/admin/conf/panel.ini”
[webserver]syncModeOnRemoveConfiguration = true - On the next steps, we need to move existing vhosts to the NFS storage. If you have working websites, this may cause short-term problems with the availability of their files and it’s better to do it during maintenance. I’d like to advise you to check that you have a fresh backup for the server and you know what you need to do to restore the server from the backup. Just in case. In my case, I have a fresh-deployed instance without production websites yet.
- To move existing “vhosts” to a new place, just add “original” to the directory name:
root@ha-node1:/home/ubuntu# mv /var/www/vhosts /var/www/vhosts.originalroot@ha-node1:/home/ubuntu# - Create a new folder for “vhosts”:
root@ha-node1:/home/ubuntu# mkdir /var/www/vhosts - Now, we need to automate automounting the NFS storage on the server with Plesk, to ensure that the storage will be mounted after reboot without any manual actions. For that, we need to change /etc/fstab and add information about the NFS storage:
root@ha-node1:/home/ubuntu# cat /etc/fstab[...]10.0.0.90:/var/nfs/plesk-ha/vhosts /var/www/vhosts nfs hard,timeo=600,retrans=2,_netdev 0 0 - When we have the information about the NFS storage inside /etc/fstab, we can execute “mount /var/www/vhosts” to be sure that everything is correct. It will mount the storage and we can go further.
- We do not change vhosts directory location. I mean, it’s still /var/www/vhosts, so, there’s no need to use the “transvhosts.pl” tool, we just need to copy files from the old to the new directory. The duration time will depend on the amount of data you have.
root@ha-node1:/home/ubuntu# cp -aRv /var/www/vhosts.original/* /var/www/vhosts - Just to be safe, I’ll check that eveything is ok with the “Plesk repair” tool:
root@ha-node1:/home/ubuntu# plesk repair all[...]Checking Linux system files .........................................
[OK]Checking virtual hosts' file system .................................
[OK][...]root@ha-node1:/home/ubuntu# - And that’s all folks. Now we have websites’ files on the NFS storage and Plesk works with the storage. Next, I’ll reboot the server to avoid having any surprises in the future. Once I can be sure that everything is 100% ok, I’ll remove “/var/www/vhosts.original” to free disk space.
Now you know how to deploy and prepare Plesk for working with remote databases and NFS storage. Supporting these new features has unlocked many additional scenarios of how to build hosting with Plesk. Centralized and/or high-available database? Yes. Centralized and/or high-available network storage? Yes. It is a really high customizable solution that could be adapted for existing infrastructure and needs.


4 Comments
Hello,
really great to see these features coming to plesk.
Do you have plans to support Centralized and/or high-available network storage for the Email Storage too?
I am already running my plesk Server with cloud storage for Mail and Files for two years now without problem, would be great to have offizial support for it.
Hi Dennis,
Thank you for asking. Well, we haven’t tested such scenarios before, and we do not have an automated test for this feature in place as is. So we cannot make any guarantees about future changes right now. It’s important that we have the test in place in case of issues/regression.
For example: In the past, we have had a similar situation with a shared NFS storage for “vhosts” directory, with customers using it without support. It was only after we managed to fix a critical bug due to testing that everything worked correctly, and we announced official support.
Although it is currently not part of the plan, we do like to collect more data and feedback about the centralized database and file storage features going forward. If you would like to share any technical details of your implementation of shared/centralized storage for emails, that would be appreciated indeed.
What I would dearly love to see is Plesk managing load balanced websites so you could offer redundancy and the possibility of auto scaling. This feels like you are laying the groundwork for that or am I dreaming?
Hi Oliver,
Thanks for sharing! Although centralized database and NFS are indeed a small step in that direction, we are at the moment not planning to add load-balanced websites or autoscaling, etc. Yet, we keep the possibility open for the future (so let’s keep on dreaming together :)).
Also, based on these improvements, we are currently working on a proof of concept that would make it possible to create a failover HA cluster for Plesk, with a step-by-step guide to follow soon.